Lesson 6 - Converting PDFs to HTML documents
Description
PDF Accessibility Challenges
Tagged PDF is sometimes called “Accessible PDF”, but this somewhat of a misnomer. Tagged PDF was developed to increase accessibility for certain disability groups, in particular people who are blind and use screen readers. However, even if PDF tags are reasonably complete and correct, the tags do not provide much benefit to people who read visually, but who have low vision, dyslexia or related conditions. This is a relatively large group of users, since the prevalence of low vision is more than 6 times that of blindness and dyslexia may affect 15-20% of the population to some degree.
While these user groups encompass people with many different needs (e.g. high contrast due to cataracts, low contrast due to eye sensitivity, narrow reading window due to a restricted field of view), the common thread is that these users need to be able to customize the rendering of text in various ways, while also avoiding horizontal scrolling.
The text customizations that these users find useful include adjustments to: font size, font colour (text and background), line spacing, word and letter spacing, font face, number of columns, and window width. Adobe Reader for Windows does provide some text customization features (e.g. Zoom, Replace Document Colours). Unfortunately, these features do not cover the full range of text characteristics that users need to customize (e.g. line spacing, word and letter spacing, font face) and the customization features are not always available, depending on how text was authored. For example, some text may disappear when re-coloured.
When content is too wide to be fully displayed in a window, there are two approaches to displaying the content:
1. Some of the content can be hidden, but available if the user chooses to scroll horizontally: Horizontal scrolling is an accessibility challenge because it is disorienting and fatiguing to have to scroll back and forth to read each line of text in addition to the usual downward vertical scrolling. If increasing the font size, changing the font face or narrowing the window result in the need for horizontal scrolling, then those text customizations have come at a high usability cost to many users.
2. The content can be reflowed into the new window width: Adobe Reader for Windows does provide a reflow feature (View>Zoom>Reflow) and this feature does leverage PDF tags, but unfortunately, reflow does not work for pages that include forms, comments, digital signature fields, and page artifacts, such as page numbers, headers, and footers.
In comparison, HTML has several advantages in terms of accessibility:
- HTML supports users customization of content via user style sheets that allow users to customize the font size, font color, line spacing, typeface, column width, etc.
- HTML is also optimized to avoid horizontal scrolling.
- HTML is a more open format than PDF, with more viewer options.
Also, if an accessible HTML version of a document (i.e. meeting WCAG 2.0 Level AA) is distributed from the same location as the PDF version, then the accessibility of the PDF file would not prevent conformance of the site as a whole with WCAG guidelines.
Exporting PDF-to-HTML
There are several different ways of converting PDF documents into HTML content. The choice of workflow will depend on whether the PDF is properly tagged and contains machine encoded text or is a document that is only partially tagged, contains no tags at all, or is a flat scan. We will review two different workflows in more detail.
Exporting with Adobe Acrobat Pro “Save As Other” (HTML)
When working with a document that is not properly tagged, which is either a flat scan, an untagged or partially tagged document, or a document that contains erroneous tags and incorrect reading order, you can export content to HTML using Adobe Acrobat Pro’s Save As Other > HTML Web Page command.
This process does not depend on (or benefit from) the file’s tag and order structure. Instead, the conversion makes a best guess at the order and structure of content based on the visual layout and appearance, organizing text from top-to-bottom and from left-to-right with basic headings. Some of the styling used in the document, such as alignment, text colour and fonts, is maintained as inline styles.
When working with a document that is partially tagged, note that Acrobat Pro will not export alt text information. Any existing alt text will be substituted for generic “image” alt text.
No matter what document type and export option is used, the resulting HTML document will require reviewing and editing. In this overview it is recommended that Dreamweaver is used for this purpose (see Reviewing and Modifying HTML content section). However, any text editor that processes code and markup can be used:
- Open the document in Adobe Acrobat Pro.
- Choose File > Save As Other > HTML Web Page.
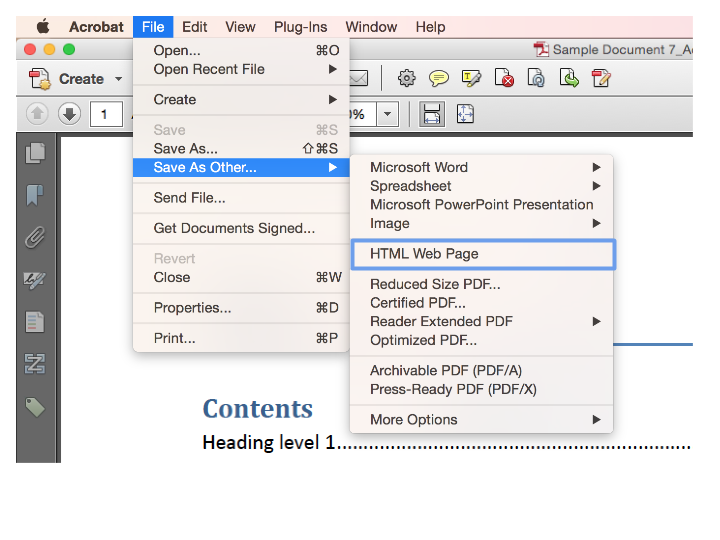
- Choose a location to save your HTML file.
Note: Adobe Acrobat Pro will generate an .html file as well as a folder with images extracted from the PDF. It is best to create a designated folder for each PDF you export, so that it contains both the HTML file and images folder. The image export may fail to export some images, or export them incorrectly, for example, along with pieces of the background. Refer to the Identifying and Replacing Missing Images section for more information.
In general, it is better to export PDF to HTML using the Callas PDFGoHTML plugin because it will produce higher quality results.
Exporting with Adobe Acrobat Pro + Callas PDFGoHTML
The Callas PDFGoHTML plugin relies on the document’s programmatic tags and order to create an HTML file. The plugin will not process files that are not tagged. Only files that are well tagged and have a correct reading order will produce high quality results. Callas PDFGoHTML will not export inline styling information as done by Acrobat Pro. Instead it will offer several viewing options, each with it’s own CSS file. This conversion will export alt text and include it both as an alt text attribute and an image caption on the page.
The code exported using the Callas PDFgoHTML plugin is much cleaner and easier to work with than code exported using Adobe Acrobat Pro’s Save As Other command. In most cases, particularly if you have limited knowledge of HTML, it is better to run a document through the Make Accessible Action Wizard, OCR, tag, and order the document in PDF form, and then export it using the plugin. (Note: Callas PDFGoHTML is a free plugin for Adobe Acrobat Pro. Before proceeding further, follow the link in the lesson library to install the plugin):
- From the Plug-Ins menu, select Callas pdfGoHTML.
- The html file will open in your default browser.
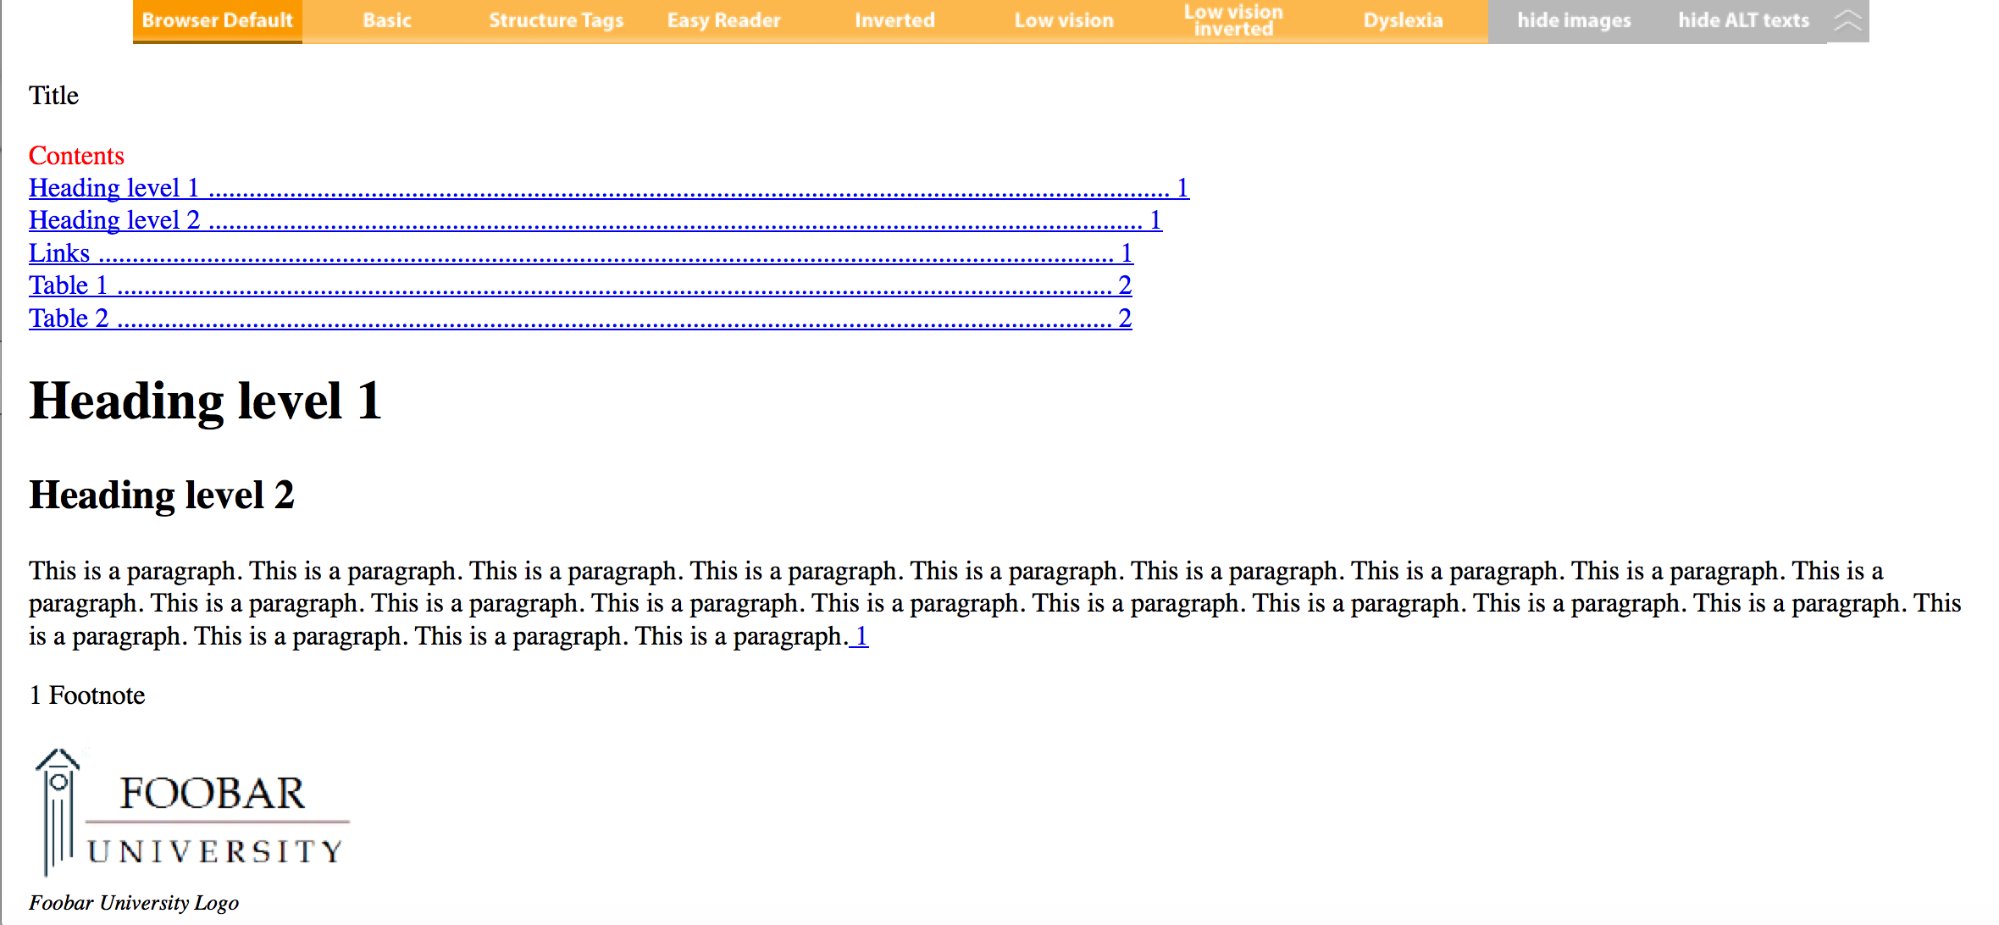
- You can view different layout options by selecting options from the menu at the top of the page.

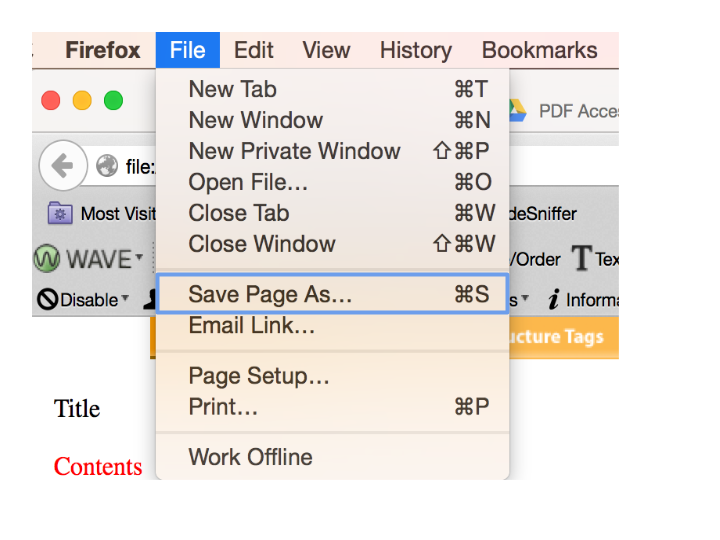
- In your browser, select File > Save Page As…
- Under Format, choose Web page, complete, choose a location, and save your file.
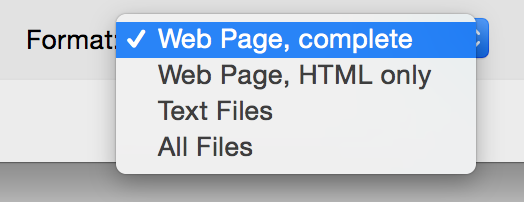
Note: Callas pdfGoHTML will generate an .html file as well as a folder with extracted images and css files. It is best to create a designated folder for each PDF you export, so that it contains both the HTML file and images and css files folder. The css file represent different viewing options, with a separate file for each option.
Identifying and Replacing Missing Images
In some cases images may not export properly during the conversion process from PDF to HTML. This can include unwanted pieces of the background being grouped with images, and vector images such as graphs and charts, being exported in parts rather than as a whole image. In this case images will need to be extracted from the document and added into the HTML file manually. Acrobat Pro’s Export All Images feature does a fairly good job of exporting all necessary images. When this technique is insufficient, as may be the case with some vector graphics, screenshots of images from the PDF document can be used instead.Once all necessary images have been collected, they can be added into the HTML file.
- In Adobe Acrobat Pro, select Tools > Document Processing > Export All Images.
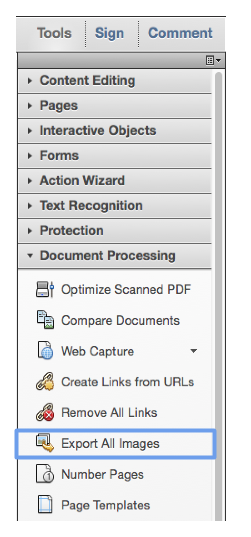
- Select the location where you would like to save your images. It is best to save all images in one place, so if an image folder has already been created in the PDF to HTML conversion process, select that folder as your destination.
- You will need to reference the new images in your HTML file. Refer to the Reviewing and modifying HTML content section for more information on how to do this.
Reviewing and Modifying HTML Content
HTML files can be edited using Dreamweaver. With a few minor modifications a fairly accurate representation of the original PDF document can be achieved. Dreamweaver allows users to easily make changes by selecting content in the viewer window.
- Open your html file in Adobe Dreamweaver.
- The file will be displayed in two windows, with a graphical view on the right and the source code on the left.
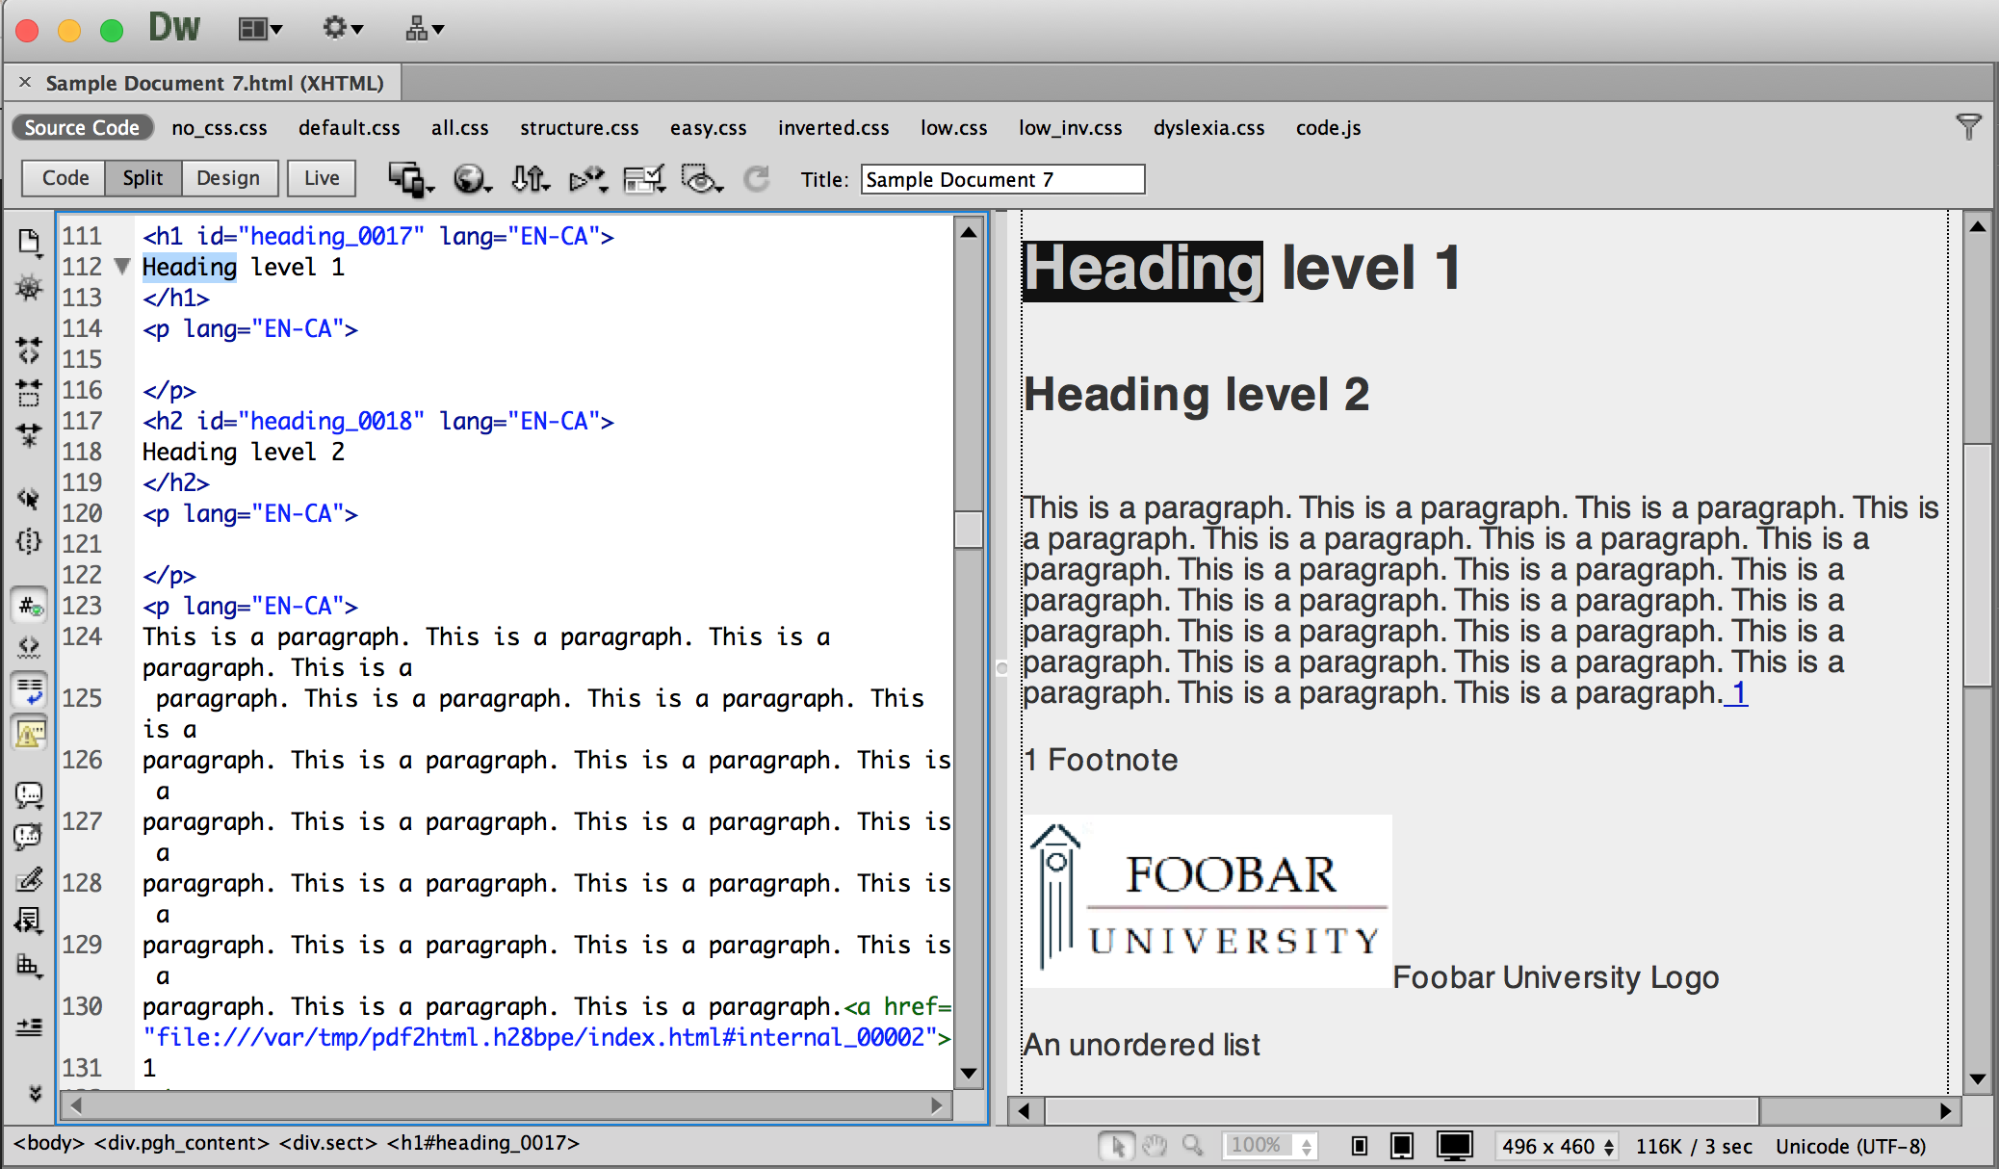
- You can select page elements by double clicking in the viewer window. This will highlight the source code on the left. You can then modify the page by making changes to the code. For example, select the heading and change the heading level, or modify the alternative text.
- To replace an image, double click on the image in the viewer. This will open up a Select Image Source pop-up window. Locate and select an alternative image on your computer. Dreamweaver will modify your source code to replace the old image with a new one.
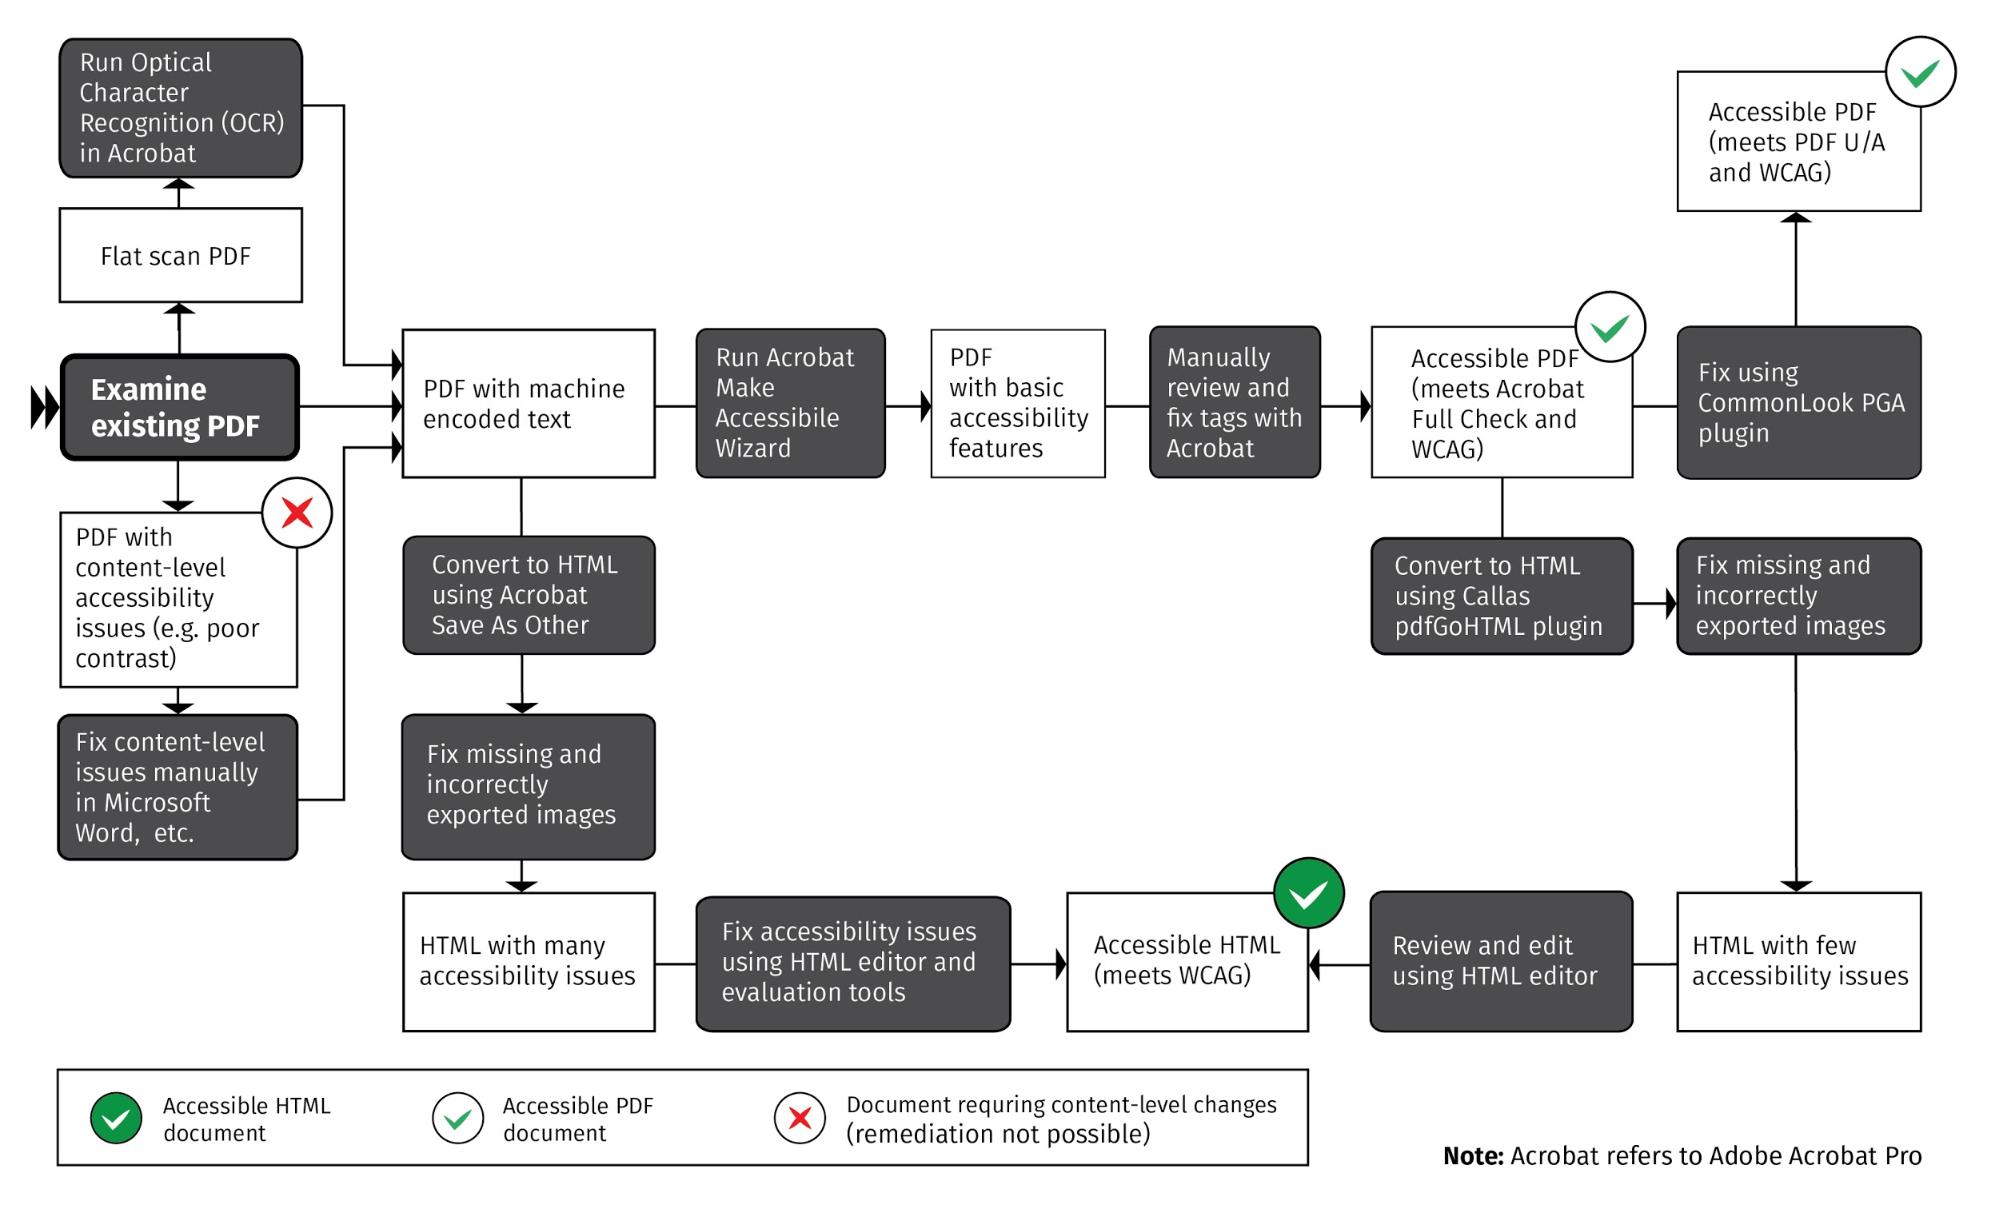
Workflow Chart
This chart compares the various PDF remediation workflows:
Task
- Complete the Intro to HTML and CSS course on codeacademy.com
- Post the code from your final coding project here, ensuring that the "Is this for an assignment?" dropdown is set to the name of this lesson.
Resources
Submissions (2)
-
Natalia Writing submission: 3626.1 days ago
-
Jessica Geboers Writing submission: 3628.2 days ago

