Lesson 4 - Basic PDF Accessibility Remediation in Acrobat Pro
Description
Now that you know how to identify accessibility barriers in PDF documents, let’s move on to fixing them. In this lesson we introduce Optical Character Recognition (OCR), and running Adobe Acrobat Pro’s Accessibility Wizard to solve some basic accessibility problems.
Using Optical Character Recognition on Scanned Documents
PDF documents can have many different kinds of source files. In some instances PDFs are created from scans, in which case the entire document is an image of the original. Because the text is an image, text cannot be selected, edited or searched, making the document inaccessible. In order to make scanned document accessible, they need to go through a process called Optical Character Recognition, or OCR, which converts images of text into machine-encoded text. Machine encoded text is searchable, and supported by AT, such as screen readers.
- Select Tools > Text Recognition > In This File. (Note: If Text Recognition is not visible in the Tools panel, go to View > Tools > Tex Recognition.)
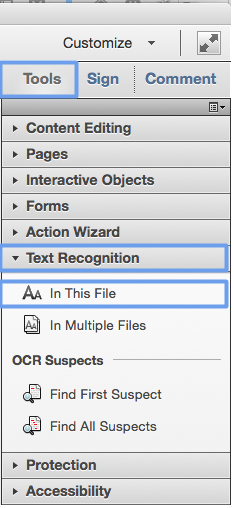
- In the Recognize Text dialog box, select All Pages and click Edit.
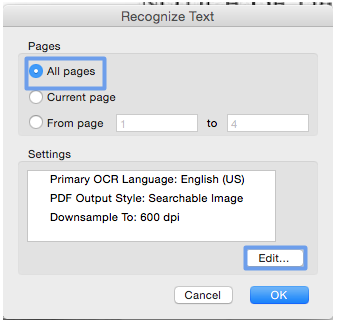
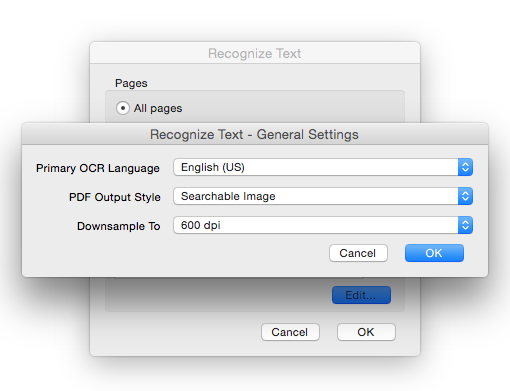
- In the dialog box, select:
- Primary OCR Language: English
- PDF Output Style: Searchable Image
- Downsample To: 600 dpi
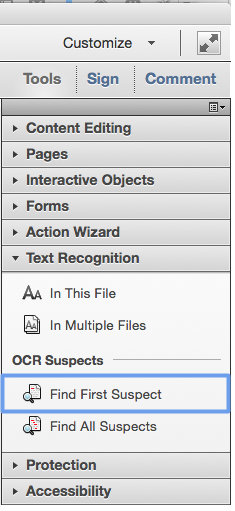
- Once the OCR process is complete, select Find First Suspect under Text Recognition. This will highlight instances where Acrobat is not sure whether or not it has identified the text correctly. This step is particularly important when scanned documents are distorted, of poor quality or contain irregular looking fonts.
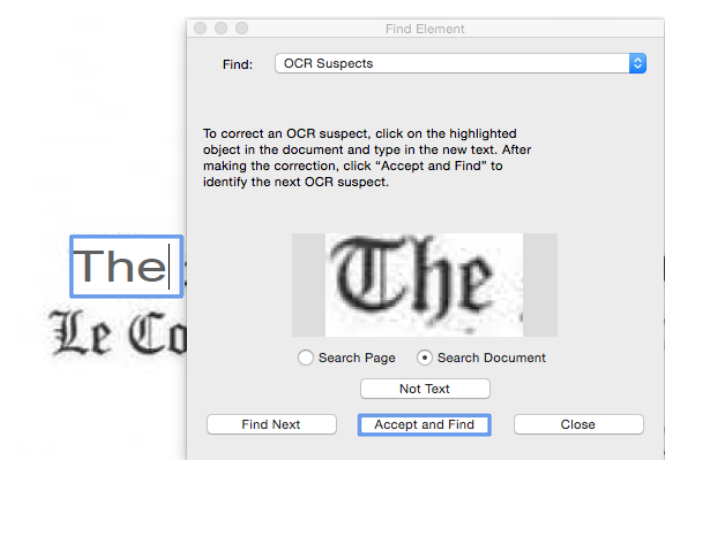
- The dialog window will display an image of the suspicious looking text, and highlight its place in the document.
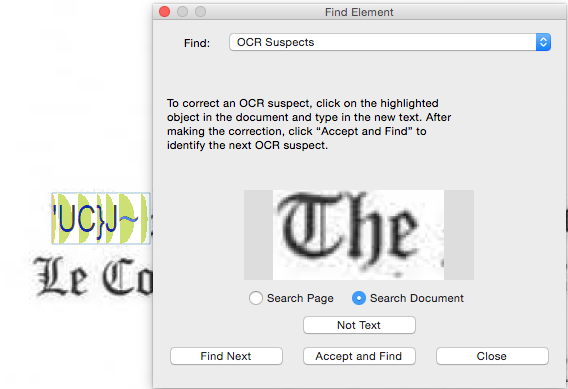
- Click in the bounding box around the source text in the document and type in the correct text. Then choose Accept and Find to move on to the next case. Repeat until you finish reviewing the document.
Using Adobe Acrobat Pro’s Accessibility Wizard
If your document already contains machine-encoded text, or once you are done running OCR, you can move on to the next step: Acrobat Pro’s Accessibility Wizard. This Wizard will ensure that you have set the title and language, tags, reading order, and alternative text to images.
Note: You can also perform OCR directly through the Accessibility Wizard, however, doing so will not allow you to review suspicious text. You can either first run OCR and review the document as outlined above, in which case the Accessibility Wizard will skip this step, or you can do it through the Accessibility Wizard and then go back and review suspicious text under Tools > Recognize Text.
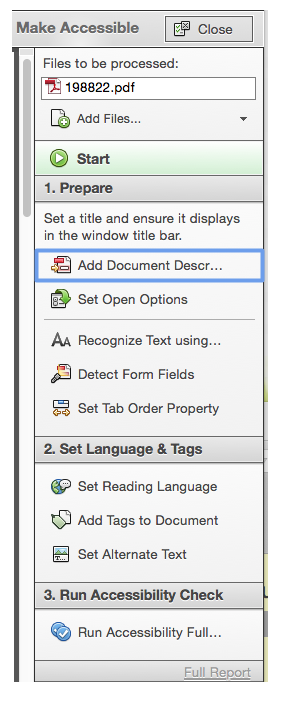
Pressing Start will automatically guide you through all of the steps described below. You can also complete the steps individually:
- Select Add Document Description
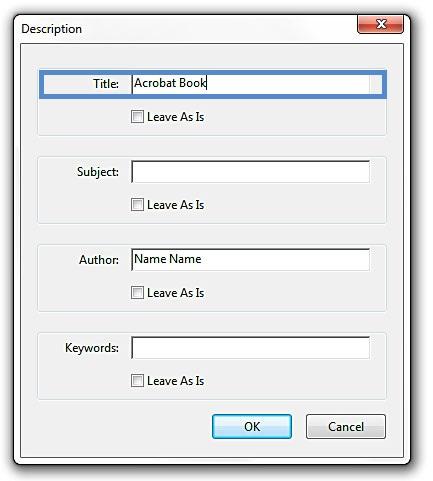
- Fill in the Title (author, subject and keywords can also be filled in but these fields are optional).
- Select Set Open Options. This step will ensure that the document displays the title rather than the file name, which helps inform users of the function and content of documents.
- Recognize Text using OCR, if you have not done so already. Remember to always review instances of suspicious text afterwards.
- Detect Form Fields. This is only required if the file is intended to be a fillable form.
- Select Set Tabs Order Property. This will create a tab order based on the document structure. Note that as any automated step, the results may have errors, and need to be checked and edited. You can review the document’s tab order in the Order or Tags pane.
- Select Set Reading Language. In the drop down menu, select the language for the file.
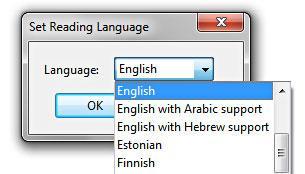 Setting the document language programmatically helps AT communicate pronunciation and punctuation more accurately.
 - Select Add Tags to Document (Note: This will automatically add tags to the file. Unfortunately, this process sometimes misinterprets the structure of complex page elements. Therefore, you should still manually check the tags.)
- Select Set Alternative Text. The wizard automatically searches for “figures" in the file. You must then fill in the alternate text in the pop up box. (Note: The wizard might not tag all the images as figures, so check if tags are correct.)
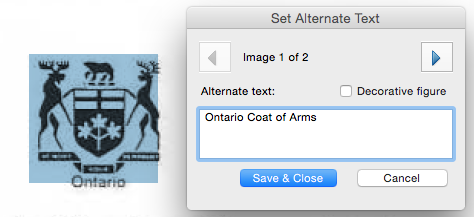
- Select Run Accessibility Full Check. Refer to lesson 3 for more information on Adobe Acrobat Pro’s Accessibility Check.
Tips for Writing Alternative Text
- Try to answer the question "what information is the image conveying?"
- If the image does not convey any useful information, leave the alternative text blank (e.g. Background images should generally have no alt text, other decorative images should only have alt text if they form a crucial part of the content, message, and purpose of the document)
- If the image contains meaningful text, ensure all of the text is replicated
- For logos, the alternative text should be the organization's name
- For groups of logos, one logo can be chosen to represent the group
- Sometimes text is included as part of a logo or footer image (e.g. the image might contain a phone number), this text should be set as the alternative text of the image
- Alternative text should be fairly short, usually a sentence or less and rarely more than two sentences
- Test by having others review the document with the images replaced by the alternative text
Reviewing and Editing Tags
Tags that are added automatically always require review. In many cases you will need to make edits to the automated results.
There are two ways of adding and editing tags in Adobe Acrobat Pro. You can either do it through the TouchUp Reading Order dialog box, or using the Tags navigation pane.
Note: Some tag types are not available through the TouchUp Reading Order dialog box. For documents with complex layouts and elements, use it together with the Tags pane method described below.
Adding/Editing Tags with TouchUp Reading Order
- Go to menu item: Tools > Accessibility > TouchUp Reading Order…
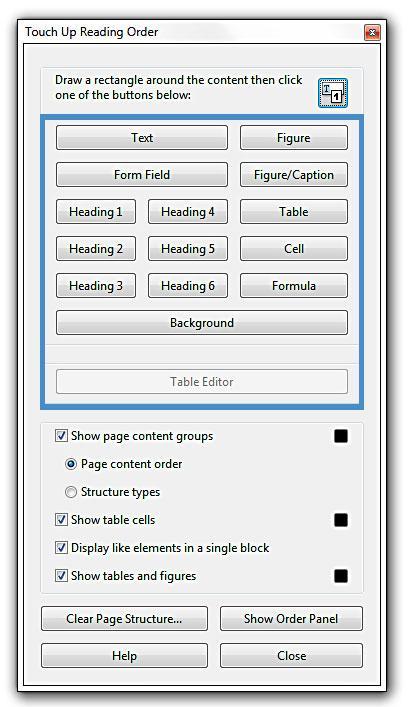
- In most cases, it will help to have the four checkboxes checked (Show page content groups, Show table cells, Display like elements in a single block, Show tables and figures)
- Using the TouchUp Reading Order tool, drag within the document pane to select a region of the page that contains one type of content (e.g. a text block)
- To add more page content to the current selection, Shift + drag*
- To remove page content from the current selection, Ctrl + drag*
- Select the appropriate button in the TouchUp Reading Order dialog to specify the tag type, a box should now encapsulate the element.
Tips for Tagging:
- On the "Touch Up Reading Order" dialog, make sure to select the Show page content groups checkbox and the Structure types radio button. This will display the type of structure for each tag, which will help you to spot mis-tagged content.
- A good place to start is tagging "Background" content, since this will reduce the number of tags to deal with. Background content should include:
- empty boxes,
- visible or invisible textbox borders (especially in busy areas where they overlap with text),
- visuals that are decorative or redundant (e.g. backgrounds, illustrations), whose content is described adequately in the text.
- If you are having difficulty tagging complex content (e.g. a complex table), consider either:
- Editing the source document to simplify it, or
- Selecting the complex content and tagging it as a figure for which you must then add alternative text that properly conveys all of the information in the new figure.
Note: If you drag over part of an already tagged element, the element is sometimes split up. This is helpful when splitting larger elements to ensure correct reading over of sub-elements.
- Select the appropriate button in the TouchUp Reading Order dialog to specify the tag (the tags are explained here)
Editing Tags using the Tags Pane
- Go to menu item: View > Show/Hide > Navigation Panes > Tags…
Note: For best results, use ‘Add Tags to Document’ first. You can also create a new tag using the TouchUp Reading Order dialog box and then edit it in the Tags Pane.
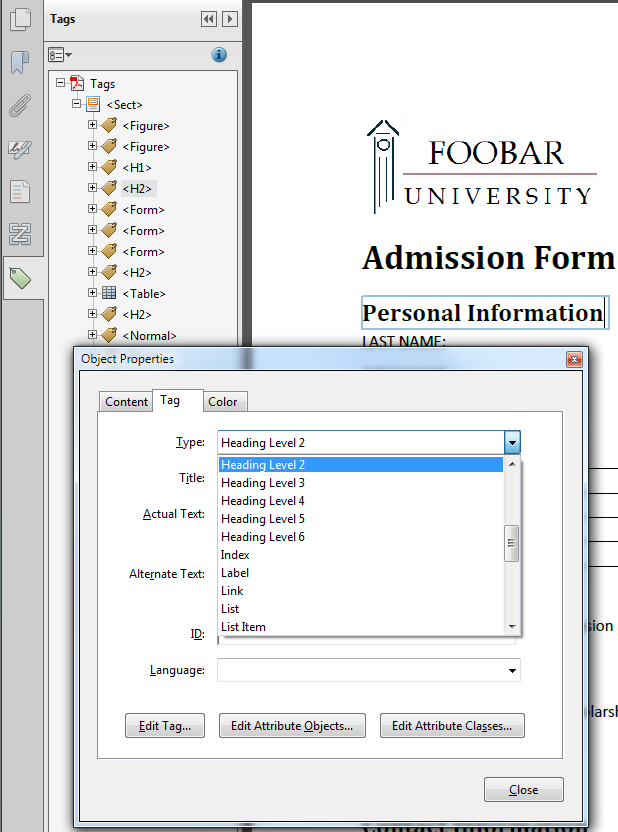
- To change a tag, locate it in the structure tree.
- Right-click on the tag, and select Properties. From the drop-down menu next to tag type, select the tag you would like to use.
- Alternatively, you can edit tags by clicking on the tag name once, and then typing the appropriate tag name (see list of tags above).
Reading Order
Reading order specifies what order content should be read in by assistive technology. In many cases, especially in documents with complex layout, the reading order may be incorrect and requires editings. Although Adobe Acrobat has a Reading Order pane, it is recommended not to use for setting the reading order. When using the Order pane, it may automatically incorrectly nest tags, it may incorrectly layer content visually, and the numbering of content frames will not correspond to the document reading order. Instead of using the order pane, It is recommended that the Tags pane be used instead. Use the tags pane to review the order and rearrange content by dragging tags.
Task
- Choose a PDF document and run an accessibility check using both Adobe Acrobat Pro and PAC 2.0.
- Run the PDF document through Adobe Acrobat Pro’s Make Accessible Action Wizard.
- Carry out the checks on the document again.
- In point form, summarize the differences between the results for each of the check results here, ensuring that the "Is this for an assignment?" dropdown is set to the name of this lesson..
Continue to Lesson 5 - Advanced PDF Remediation with CommonLook PGA »
Resources
Submissions (2)
-
Natalia Writing submission: 3663 days ago
-
Jessica Geboers Writing submission: 3673 days ago

