Lesson 2 - Introductory Project - Laser-cut Business Card
Description
This lesson will give you an overview of the workflow and teach you how to create custom business cards for yourself! We’ll be working with Adobe Illustrator, one of the leading vector editing applications available, and used in a range of industries.
1. Install Adobe Illustrator
If you have access to a computer with Adobe Illustrator, you can skip to the next step. Otherwise, Adobe offers a free trial we can use to go through the lesson. We’ll also link to some free, open source alternatives; but Illustrator is worth getting some experience with, because it’s the industry standard.
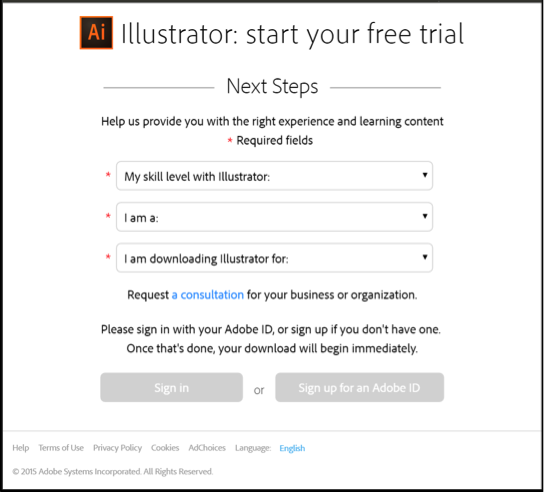
Register and download the Adobe Illustrator CC trial from: http://www.adobe.com/go/tryillustrator/ , you’ll also need to create an Adobe ID account to complete the download.
Follow the installation instructions for your platform, this will install a 1 month trial of Adobe Illustrator CC.
2. Create a New File
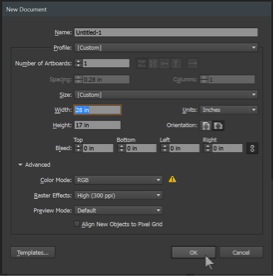
Launch, Illustrator and then use File > New… (or hit Ctrl + “N” on your keyboard) to create a new Illustrator Document. We’ll make a few changes in this window to make sure we create a file that’s easy for lasers to work with. Change the “Units” to “Inches”, set the “Width” to 28”, set the “Height” to 17”, and under “Advanced” change the “Color Mode” to “RGB”. Once you’ve made these changes, click the OK button to open the new file.
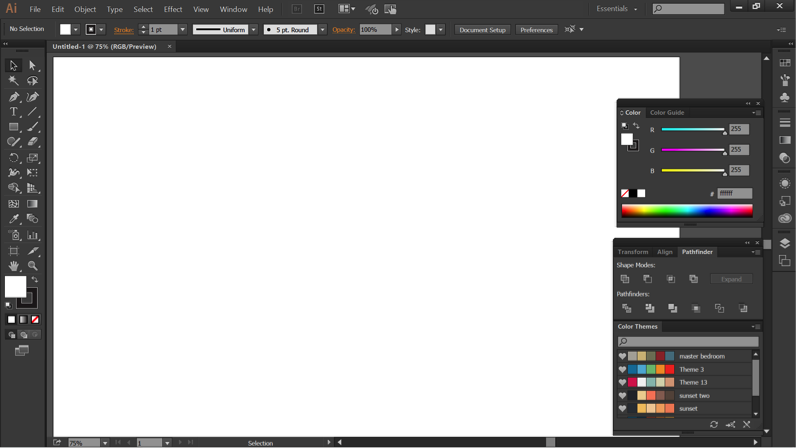
Once the document opens, you’ll see Illustrator’s main Document View. You’ve got the Program Menu along the top (File, Edit, Object, Type, Select, Effect, View, Window, and Help), along with a Context-aware Options Toolbar below it, that changes based on what objects you’ve got selected. Down the left side of the screen you’ll see the Main Toolbar, containing the bulk of the tools we’ll be using. On the right hand side, you’ll see a number of Panels with additional options for the tools. And in the center, behind all of those is the document space and the Artboard, represented as a white rectangle.
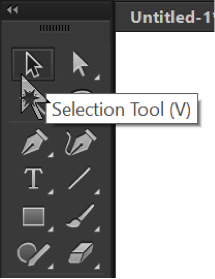
The first tool we’ll learn about is the Selection Tool, which is the at the top left corner of the Main Toolbar, and represented by a Black Arrow. You can also activate it by pressing “V” on your keyboard, which is really worth learning because of all the uses this tool has. As its name implies, the Selection Tool is used for selecting objects in Illustrator, but it’s also used for resizing objects using their “Handles” (small square indicators on the sides and corners on an object’s bounding box), and repositioning objects by dragging them.
3. Create Bussinesscard Online
First we’ll want to create an outline for the business card. This will let us see the actual size of the card which will be helpful for laying out the text and graphics, and the laser will use this line to cut the borders of the cards.
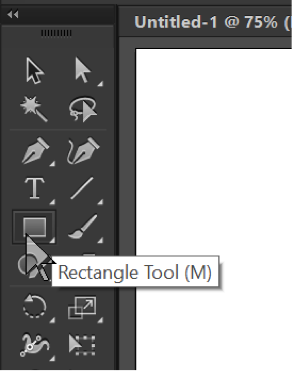
Select the Rectangle Tool from the Main Toolbar on the Left (or you can press “M” on your keyboard), this tool is used to create rectangles and boxes. It’s the fifth icon from the top, on the left hand size and looks like a rectangle. If you press and hold on the Rectangle Tool, the Shapes Tool menu will show up with a list of other shape tools you can use, though for our business card we’ll be sticking to the Rectangle Tool.
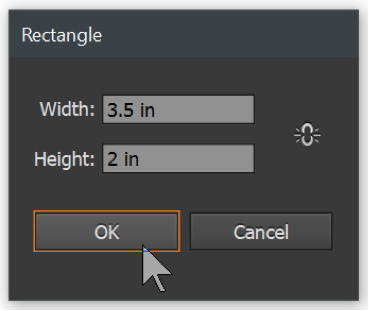
If you click and drag your mouse, you can visually set the dimensions of the box. If you’d like to create a rectangle of a specific size, left clicking without dragging will bring up the Rectangle Dialogue. A quick google search for “standard business card size” told me that the size of a typical card is 3.5” x 2”. Once you’ve set the dimensions, click the OK button to create the rectangle. Illustrator will place the rectangle on the Artboard, and select it which is indicated by a blue outline.
4. Add Text
Illustrator is wonderful for working with text and different typefaces / fonts. Select the Text Tool from the Main Toolbar on the Left (or you can press “T” on your keyboard). The icon looks like a capital letter “T”, above the Rectangle Tool. Similarly to the Rectangle tool, clicking and dragging will allow you to visually define a box for your text, clicking will create a textbox that will resize to the dimensions of your text. You can change various properties like the Font, style and Font Size from the Options Toolbar at the top of the screen when you’ve got a text object selected.

Illustrator will allow you to input multiple lines of text by using the Enter key, but keeping them separate objects will make laying out something like a business card easier and give us more artistic freedom. When you reach the end of a line of text, rather than hitting Enter, hit the Esc key on your keyboard. This will close the Text Tool, and when you reselect it from the Main Toolbar or by pressing “T” on your keyboard it will create a new text object. This will let you easily change the size, positioning and font of the lines independently.
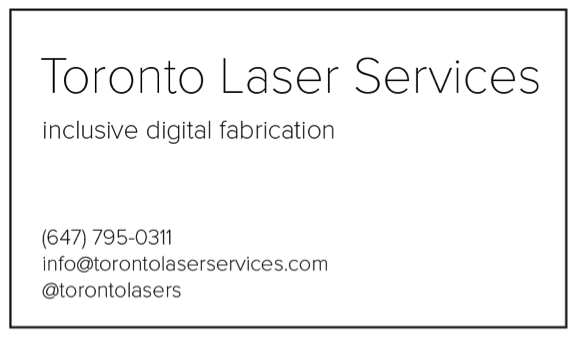
Tips choosing and laying out your type: try to use 1 or 2 fonts, maximum; and avoid resizing text smaller than 10pt.
5. Add a Logo (optional)
Text-only business cards have a clean and professional look, but a good logo is a nice way to make your cards stand out. Use File > Place... from the Program Menu (or press Ctrl + Shift +“P” on your keyboard) to bring up the Place Dialogue.
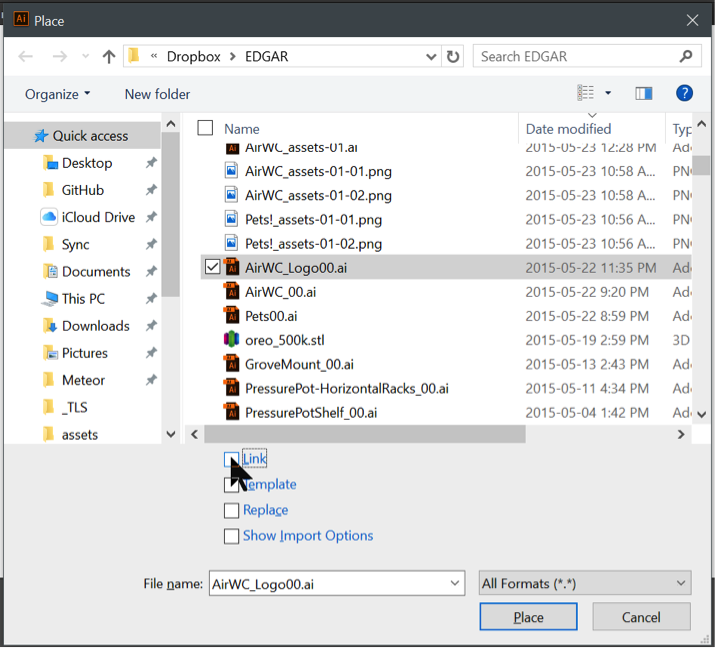
Locate your logo image file (Adobe Illustrator supports a broad range of filetypes), and uncheck the “Link” checkbox before clicking the OK button to continue. Clicking anywhere in the document will “place” your file. Then activate the Selection Tool from the Main Toolbar (“V” on your keyboard), which can be used to resize and reposition your logo.
If you’re interested in a logo, but don’t have one already, feel free to browse: https://thenounproject.com/ If you find a suitable logo, create a free account and download the image (download the SVG option if it’s available), then use the Place Dialogue to add the logo to your business card.
6. Configure File for Laser Cutting
Once you’re happy with the card’s layout, the file is nearly ready to be sent to a Laser Cutter. Different services and machines may have different settings, so it’s worth contacting your laser cutting service to ensure you’re making a compatible file.

For Toronto Laser Services, we prefer:
a. Stroke Width: Use the Selection Tool from the Main Toolbar (“V” on your keyboard) to select the rectangle from our business card. You’ll notice “Stroke” in the Context-Aware Options Toolbar below the Program Menu, with a default value of 1pt. This is the thickness of the line, and used to tell the laser which lines we want to be read as vector cuts or etches. Change the Stroke value from 1pt to 0.0125”, which will specify it as a hairline
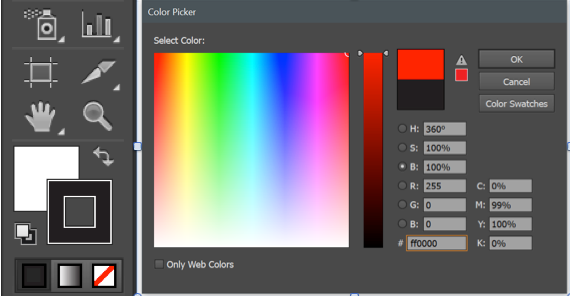
b. Stroke Colour: With the rectangle still selected, you’ll notice at the bottom of the Main Toolbar Illustrator indicates the colours used in the shape. On the left there’s a filled square that indicates the shape’s Fill Colour, and on the right there’s an outlined square that indicates the shape’s Stroke Colour. Double-Clicking on either of the indicators will bring up the Color Picker dialogue, allowing you to modify the colours.
The Color Picker gives you many different ways to specify and adjust the colours, but for Laser Cutting we’ll be working with RGB. On the left half, you’ll notice some values: H, S, B, R, G, B, and #; for our purposes we’ll only need to use the last 4: R, G, B, and #.
Double-Click the Stroke Colour indicator on the right, and use the Color Picker dialogue to change the stroke colour to red. You can either change the value of R, G, and B to: 255, 0, and 0 or enter “FF0000” into the “#” field. The “#” field signifies the Hex field, which is simply another notation of RGB colours.
When you’ve verified all the settings are correct, use File > Save (or press Ctrl + “S”) to save your file. Give it a meaningful filename which will help you find the file again.
7. Convert Text to Outline + Save as Cutfile
Once you’ve double checked the spelling one last time, we’ll convert the editable text to vector shapes before sending the file off to ensure we get the font we selected. Use Select > All (or press Ctrl + “A” on your keyboard) to select every object in your file. While all the objects are selected, use Type > Create Outlines (or press Shift + Ctrl + “O”) to convert all of the text objects into shapes.
Now use File > Save As… (or press Shift + Ctrl + “S”) to save the file with a different filename, we suggest adding the word “-outlined” to your filename to keep things organized. This way you keep your original design file with editable text, and also have an outlined file that is ready to send to the Laser Cutter.
8. Send files to Laser Cutter
The final step is to get the file cut! Laser cutting is available online through cutting services, and locally through schools, makerspaces, public libraries, and other facilitators. Use a search engine to locate the most accessible laser cutter to you, and be sure to consider the turn-around times and associated costs.
If you have any difficulty connecting with a facilitator, don’t hesitate to contact us at Toronto Laser Services. The shop is located in Toronto’s west end, in an open, safe, TTC / wheelchair accessible location; and ships globally.
When you’ve contacted a facilitator or space, they will let you know about their preferred process. At this point you you’ll need need to specify or provide the material you hope to use, as well as your “outlined” file from Step 7. You’ll also want to specify how many cards you’d like to have cut, though it’s generally a good idea to do a test cut of any file you haven’t cut, before doing many to ensure there are no adjustments that need to be made to the file.
Advanced
- Double-sided Business Card: Now that you’ve learned to design laser-compatible files with Adobe Illustrator, try taking your business cards to the next level. Designing another file that can be etched onto the back of the card can add nice details or a larger logo.
- Postcard / Greeting Card: The same tools used to create business cards can be used to create beautiful Postcards and Greeting Cards, especially when you go double-sided!
Task
Now that you’ve got them designed, be sure to get your business cards made! Did they look the way you expected? Where there any surprises? Share your response to "What is the most difficult or time consuming part of the laser-cutting process for you?"
Continue to Lesson 3 - Advanced Project - Custom Parametric Box »
Submissions (1)
-
Tania Rashid Discussion post: 3616.4 days ago
